Restoring an M1 Garand Rifle
Finish Reaming
Amazon B00O7ZKZOK
Finish Reaming an M1 Garand Chamber
We need to do the final reaming of the chamber on the
new barrel of the Garand we are assembling.
The chambers of new Garand barrels are not
"finish reamed".
Some metal remains to be removed before a shell will
properly chamber.
Why?
The barrel is threaded into the receiver.
The threads on the barrel are specified in terms of their
own dimensions, but the precise positioning of the threads
from the rear face of the barrel is not predictable.
This gets into concepts like indexing.
When you thread random barrels into Garand receivers,
you cannot rely on the thread indexing.
Let's see how to finish ream an M1 Garand chamber!
The M1 Garand is gas-operated. The gas port near the muzzle must point straight down, so you don't just screw in the barrel until it stops. You have to stop at the proper orientation during the last rotation. And, the thread orientation in terms of rotation about the barrel axis is not necessarily predictable. This is a plain way of saying "You cannot rely on thread indexing."
So, when you have screwed the barrel into the receiver, and you place the bolt into its closed position within the receiver, the distance from the forward bolt face to the forward end of the chamber is not predictable.
Here's the solution — the manufacturer does not attempt to ream the chamber to its final size and shape when machining the barrel. The chamber is not quite large enough as the manufacturer leaves metal that must be removed. You assemble the barrel into the receiver, and then use a special tool to do the final reaming of the chamber.

Amazon B0006F5XOW
The manufacturer can avoid litigation this way. If the manufacturer had sold you a barrel and you blew it up with faulty ammunition, you might sue the barrel manufacturer. But if they sold you an unfinished barrel that you supposedly "finished" and then it blew up, it's your fault. American citizens have the right to keep and bear lawyers, and there is no requirement that they be used responsibly.
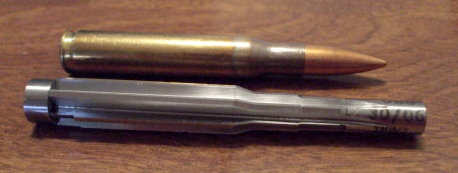
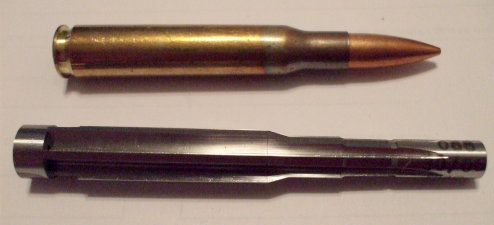
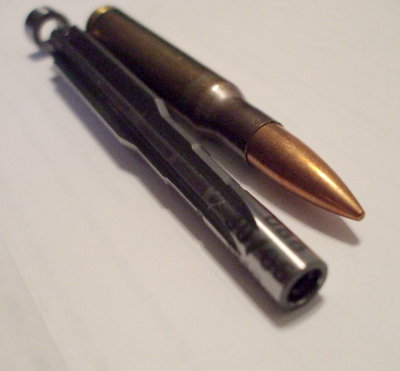
Here is an example of a Pacific Tool and Gauge chamber reamer for .30-06 caliber next to a .30-06 shell.
This reamer has six flutes. It produces the correct cross-sectional chamber shape, and as it cuts forward into the barrel, it sets the correct headspace. That is, the correct distance from the back face of the cartridge (and thus the forward face of the bolt) forward to where the cartridge seats into the chamber.
The cartridge is made of relatively soft thin brass. It needs to be tightly surrounded by the sturdy steel of the barrel (most of the cartridge) and a bolt that is locked into place (the rear face of the cartridge). For why this is important, see, for example, Exterior Ballistic's good explanation.
Here are the dimensional specifications of .30-06 Springfield rounds. Headspace is the distance between the rear face, at left, and a reference datum line at the surface where the cartridge seats into the chamber. The datum line on .30-06 is on the conical "shoulder", nominally about 2.050" or 52.1 mm from the rear face. According to SAAMI, the Sporting Arms and Ammunition Manufacturers' Institute, the datum line is where the diameter of the cartridge drops to 0.3750" or 9.525 mm.
A later page in this series discusses ammunition, see it for further dimensional details.

.30-06 Springfield case, Dimensions in inches
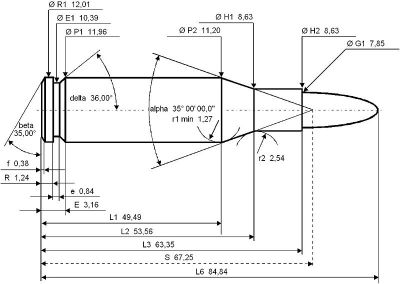
.30-06 Springfield cartridge, Dimensions in mm

Why were we doing our own chamber reaming instead of having a competent gunsmith do it? (Beyond the Zen pleasure of finish reaming one's own chamber, of course)
My friend asked a couple of gunsmiths in his area about doing the job. They quoted a price equal to the cost of the tool itself and one even added, "You also would have to pay for the cost of the tool in addition to that price for the work, since I don't have a .30-06 chamber reamer myself. I would, of course, keep the tool." And they wonder why they aren't getting much business....
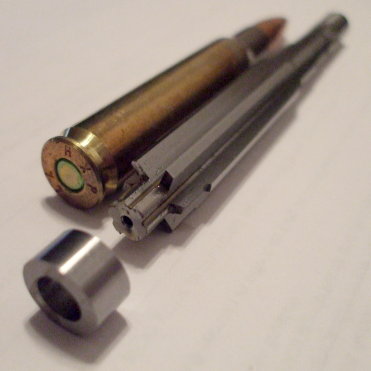
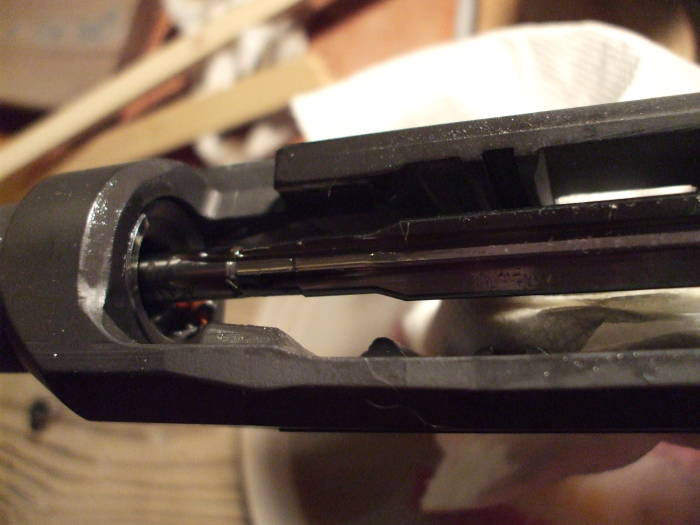
The first picture below shows the bushing pulled off the rear of the reamer. The bushing is very slightly smaller in diameter than the cutting flutes, and it allows the bolt face to ride against the rear face of the reamer.
During use you need to make sure that there are no chips between the forward face of the bushing (the face away from you in this picture) and the reamer flutes, as well as on the rear face of the bushing between it and the bolt face. You're looking for accuracy on the scale of 0.001" here....
Also, the bolt should be "stripped", or disassembled, and only its main body used. The firing pin, ejector, and extractor will interfere with the measurements. You want just the bolt body itself seating its forward face against the gauge or test cartridge.
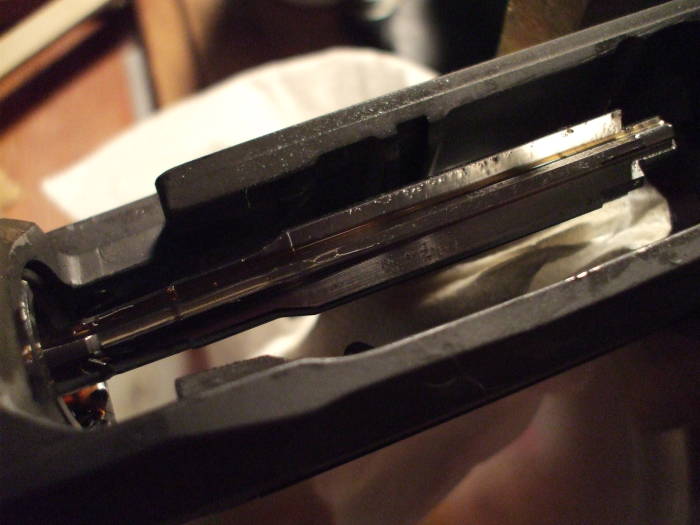
The second picture above show the forward (muzzle) end of the reamer. That forward end is tapped, you run a steel rod down the barrel from the muzzle end and thread it into the reamer.
That rod needs some sort of T-handle at the other end.
The reamer flutes are sharpened so that when you turn the T-handle clockwise from your view beyond the muzzle end, it tightens the handle onto the shaft and the shaft into the reamer.

Amazon B0069KPMGW
Here begins the part where you may ruin your barrel...
Hold the reamer in the receiver and screw the rod into place. Dribble a liberal coating of cutting oil onto the reamer.
Some sources recommend cutting lard, which may be as simple as plain old rendered lard. We used a cutting oil that was significantly thicker than the very light stuff I have used for machining. It's not like I've done all that much machining, but what little I have done has always involved very light cutting oil.
Remember that you can cut metal away, but you cannot put it back. So start very slowly until you can measure what's really going on.
Check the headspace with gauges (see below) before even starting. Then cut just a couple of turns by hand, disassemble the reamer and carefully clean the chamber, and check it again.
The feeling I got while turning the reamer was that you really don't want to apply much pressure at all. You certainly don't want to be applying any force to the bolt to see if it will fall into place. In fact, the bolt should not be against the reamer while you are cutting. When the chamber gets very close to its final size and the bolt is about to fall into place, the leverage of the inclined plane effect of the bolt lug along the receiver rail would provide more force than you expect or want. Archimedes was right.
I think that you should feel more of a grinding or sliding effect. Too much pressure could lead to the flutes grabbing, potentially making for small-scale chipping or scoring. Someone else working on this project described it as feeling like cutting through a block of cheddar cheese.
Also, when testing to see if the bolt will drop into place, bring the bolt forward gently. Don't press it forward and force the cutting flutes into the chamber walls. The bolt should fall into place on its own.
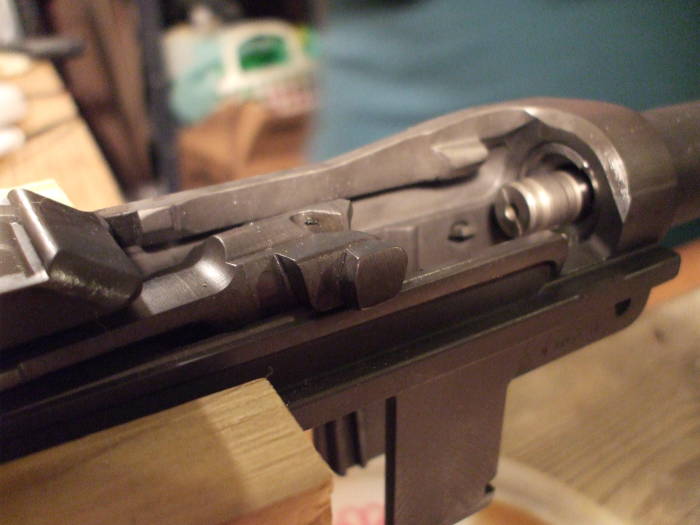
Above you see the reamer after it has been used for a few turns and backed out into the receiver. You can see the small shavings on the flutes. I'm pretty sure that they should be shavings, not chips, not matter how tiny.

I did have the reamer grab and break free a few times in the first couple of sessions of 2-3 turns. The result was more chip-like.
Back off the pressure and give it a couple of turns with very light pressure and more of a grinding feel. You will feel it almost want to grab again within the first half-turn or so (the passage of three flutes past the gouge on a six-flute reamer), and then it should smooth out.
Back the reamer out into the receiver while still turning it in the cutting direction. Then unscrew it from the shaft.
Good luck with the disassembly. The hardest part of the process for us was unscrewing the reamer from the shaft. This reamer didn't have a flat where we would place a small wrench.
Then very carefully clean out the chamber so no chips are in there to distort your measurements. Here's what we did:
- Run a couple of cleaning patches down the barrel from the muzzle end. To be honest, we usually just used a small piece of paper towel. The first one may remove small visible shavings. The second should just remove the heavy cutting oil.
- Spray the chamber from the receiver end with brake cleaner. It will dribble out the muzzle end, so watch where it goes because brake cleaner dissolves most any plastic.
- Use a compressed air hose from the muzzle end to blow out anything remaining. Stuff a paper towel into the receiver so you aren't spraying your work area with a fine mist of cutting oil and brake cleaner.
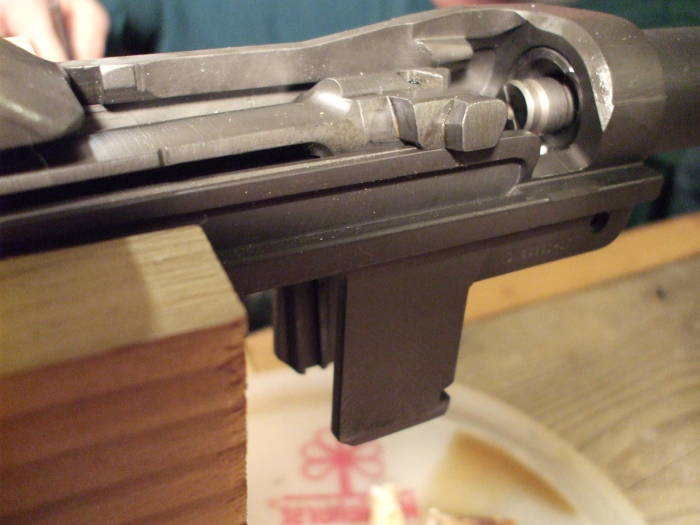
We have placed a GO gauge in the chamber, and are preparing to attempt to close the bolt.
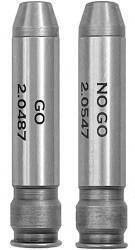
The chamber gauges come in three sizes with names that may be misleading, at least in the case of military arms: GO, NO-GO, and FIELD.

Here's what the names seem to really mean on military ammunition like the .30-06:
- GO — Should be called GOOD, this means that you have a chamber that is large enough to take a shell and for the bolt to close as required.
- NO-GO — Should be called ACCEPTABLE, there is more headspace than the GO (GOOD), but it is still safe to use on military arms like an M1 Garand.
- FIELD — Should be called NO or FAILED. If you can close the bolt on a FIELD gauge, then there is too much headspace and the barrel should be replaced. Maybe this is an old barrel that has been shot out. Or maybe you just ruined your barrel by reaming out too much metal.
The
SAAMI
specification for .30-06 is:
Datum Diameter at Shoulder = 0.375"
2.0487" Minimum headspace
2.0587" Maximum headspace
We used
Forster
gauges, which the company describes as:
Datum Diameter at Shoulder = 0.375"
2.049" GO
2.055" NO-GO
2.058" FIELD
Forster .30-06 GO headspace gauge Forster .30-06 NO-GO headspace gauge Forster .30-06 Field headspace gauge

Amazon B084BRFS4J
Someone suggested Clymer gauges, said to be recommended by "most experienced military armorers", although Clymer does not publish their gauge specifications beyond saying that their GO gauge is within 0.0001" of the minimum SAAMI spec, the NO-GO is 0.006" greater than the GO, and the FIELD is within 0.0001" of the maximum SAAMI spec.
You would expect a newly built precision rifle to close on the GO gauge only. Of course, if it closes on GO but does not close on the NO-GO, it is possible that it will not chamber ammunition made to looser standards. Or, as we found, possibly on any ammunition you have available.
Also be careful, do not allow the bolt to slam home on the gauge and damage the interior surface of the chamber.
We are preparing to close the bolt in the first picture below. The GO gauge is not yet fully in the chamber.
You can see where the bolt lug is going to drop off that rail.
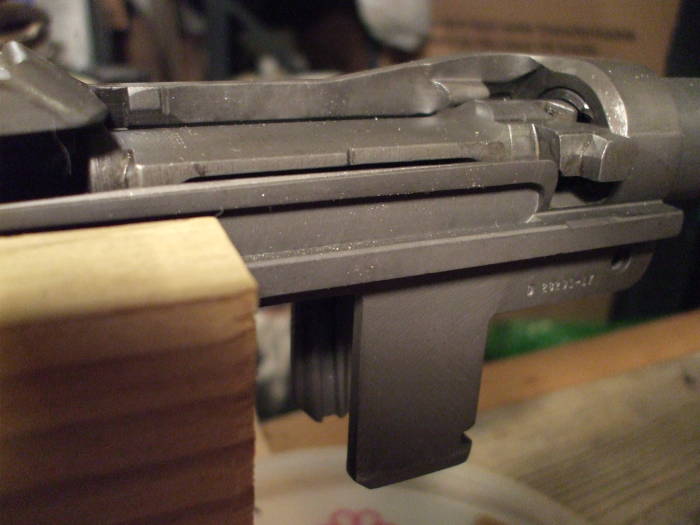
In the second picture, the GO gauge has been seated in the chamber. It is as far forward as it can go.
The bolt has been brought as far forward as it will travel, seating the bolt face against the gauge.


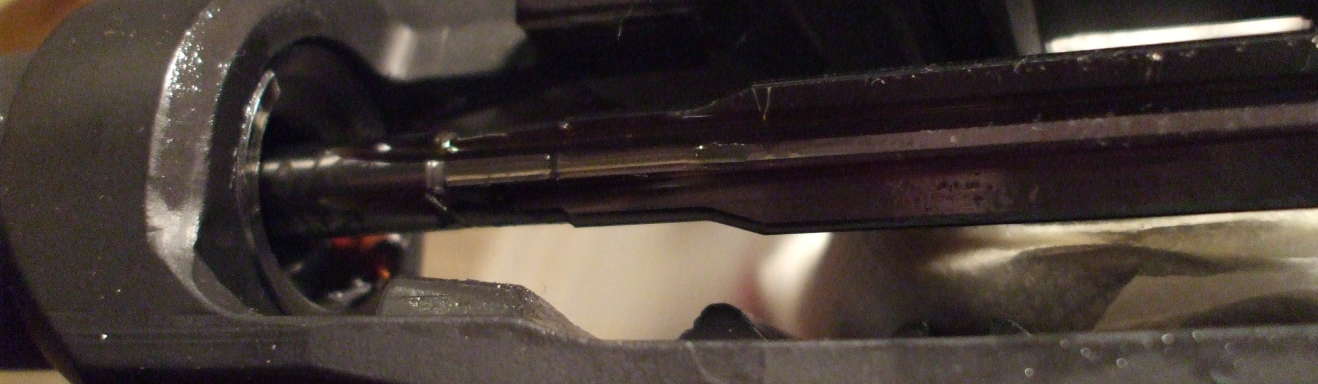
Here is a closeup of that last picture. A little more metal must be removed to extend the chamber forward. That will let the GO gauge seat further into the barrel and away from the receiver, and that will let the bolt travel a few thousandths further forward and drop the lug into place.
Open the bolt, remove the gauge, and reassemble the reamer and remove some more.
After we got the bolt to close on the GO gauge, we tried three varieties of ammunition: Remington (brand-name US manufacturer), Lake City (another US manufacturer), and Greek surplus. The bolt wouldn't fall closed on any of them. We cut a few more turns to remove enough metal that it would also close on actual ammunition. (Safety officers remember that we were using a disassembled bolt with no firing pin)
However, we have since decided that it would have been better to stop when the stripped bolt would fall closed on a GO gauge through gravity alone. It probably will not simply fall closed on typical ammunition, but remember that the bolt is slammed home by a powerful spring during operation. The result works fine, but the next time we will do this a little differently.
I think we took about 2 hours to finish ream the first barrel!
The second one took maybe half that, even though we had switched roles.
I think that you could get a lot better and faster with practice.